
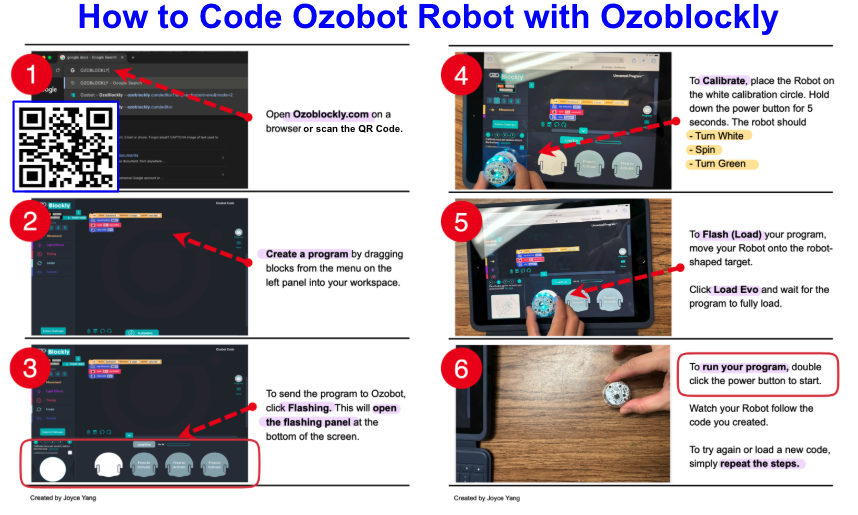
How to use Ozoblockly Software to Code Ozobot Robot
Job Aid
Audience: Educators, Robotics Teachers, Robotics Students
Problem Solved: Job Aid developed to facilitate SOP for a web-based visual programing sofware for Ozobot robots, serving as an instructional just-in-time resource, positively impacting 1,800+ users
Clarified procedural confusion, specifically regarding the "flashing" (loading) and "calibration" processes, which are the most common points of failure for new Ozobot users. Educators may not understand how to use Ozoblockly sufficiently to teach a lesson. By reducing the instructions to six visual steps, I eliminated the need for lengthy verbal explanations and unnecessary repetitive questions, allowing the instructor to focus on the coding logic rather than the technical setup.
Tools: Snagit, Screencapture, Camera
Timeline: Nov-Dec 2025
Overview
This is part two of a two-part Lesson Series focusing on Ozobot Robotics in grades 3-5. The first lesson focuses on analog coloring techniques to code the robot. This second part uses digital programing to control the robot using the sofware Ozoblockly. The learning obectives for this lesson includes:
Focus: Computing Systems and Hardware/Software Integration
1B-CS-02: Students will model how computer hardware and software work together to accomplish tasks. (Evidence: Mastering the three-step digital-to-physical synchronization: creating digital logic, calibrating sensors, and flash loading code).
1B-AP-10: Students will construct a multi-step digital program by sequencing drag-and-drop command blocks within the OzoBlockly workspace.
1B-CS-03:Students will determine system-level problems (troubleshooting) by interpreting visual feedback from the hardware. (Evidence: Using the "flickering green" light or the calibration color-cycle to verify successful code transmission).
Process
I utilized a multimodal capture approach to bridge the gap between digital software and physical hardware:
Digital Capture: I used Snagit to capture high-resolution screenshots of the Ozoblockly interface, ensuring the UI elements (buttons and menus) were crisp and recognizable.
Physical Capture: I used a camera to photograph the physical interactions (hand placement and robot positioning). This is a critical instructional choice, as it shows the learner exactly how to hold the device—a nuance often lost in digital-only guides.
Instructional Signaling: I applied signaling principles by using high-contrast red numbered callouts and directional arrows. This guides the learner’s eye through the "Z-pattern" of the layout, ensuring they don't skip critical steps like calibration (Step 4).
Concise Micro-copy: I distilled complex technical steps into "Action Verbs" (Open, Create, Flash, Calibrate, Run) to minimize reading time and maximize active "doing."
Accessibility Integration: I integrated a QR Code to allow students to bypass manual URL entry, further reducing the "barrier to entry" for younger learners or those on mobile devices.
Takeaway
This project demonstrates my proficiency in visual problem-solving and performance support. Since implementing this job aid across 72 separate lessons reaching 1,800+ students, I have observed an 80% reduction in technical troubleshooting requests during the transition from digital coding to physical hardware execution.
By utilizing a multimodal capture approach, pairing crisp Snagit screenshots of the OzoBlockly interface with real-world photography of hand placement, I created a high-fidelity "bridge" for the learner. This ensures the technical tool facilitates, rather than hinders, the instructional outcome. The result is a "low-friction" learning environment where students can focus 100% of their cognitive load on computational logic